
Here is how to make one of those cute carseat canopies to keep your little one protected from the weather and unwelcome germs. I love the front slit on this carseat canopy. Trust me, after having 3 babies the front slit is something that you want!

What you need:
1-1/2 yards of cotton or flannel fabric for BACK
1-1/3 yards of cotton or flannel for TOP
4-1/4 yards of RIBBON
5-1/2 yards RICK-RACK
Buttons or Flowers for Straps
Sew-On Velcro
Fabric Marking Pen
Cutting fabric:
(Pre-wash, dry and iron all fabric!!!)
Top and Back. . .
Cut 35″ wide x 34″ long out of your TOP fabric. Then cut 2 strips 5″ x 35″ from the BACK fabric. Cut 35″ wide x 42″ long out of your BACK fabric.
If not piecing the top. . .
Cut the TOP and BACK 35” wide x 42″ long.
If fabric has a directional pattern, make sure to cut it so it goes in the right direction (you may need extra fabric). If you are piecing the top, like mine make sure the finished dimensions of the top are still 35″ x 42″.
Straps. . .
Cut 2 pieces 6-1/2″ x 9-1/2″ out of the TOP fabric.
Cut 2 pieces 2-1/2″ x 9-1/2″ out of the BACK fabric.
If not piecing straps. . .
Cut 2 pieces 4-1/2″ x 9-1/2″ out of BACK and then cut 2 of the same size out of TOP.
Putting it together:
***All seams are 1/2 inch.***
Straps:
Place right-sides together and sew. Then do the other side. Repeat for both straps.


Flip right-side out and iron.

Fold ends in 1/2 inch and iron a crease. Do for both sides. Repeat for the other strap.
DO NOT SEW THIS CLOSED YET


Cut 4 pieces of ribbon each measuring 9-1/2 inches long. Place ribbon on the seams.

Pin in place. Tuck in the ends of the ribbon and pin.
(This is why you havent sewn the ends closed yet.)

Sew the ribbon on by going down BOTH SIDES of the ribbon as I have done here.
Please take your time on this, it moves/bunches easily!!!

Sew down both pieces of ribbon, on both sides of the ribbon. Repeat for the other strap.

Now do some topstitching on the sides of the straps (just for looks).
I like the double seam look so I do a 1/4 inch seam and then go back and do an 1/8 inch seam, to give it a double needle look. Or you can just use a double needle.

Now pin and sew the ends of the straps closed. Repeat for both straps.

Time for the velcro.
I cut mine to be the same length as my button so the stitching could easily be hidden under the button.

The first velcro to attach is where the button will be sewn on.
I placed mine 1/2 inch from the end of the strap. Repeat for other strap.

The next velcro is up to you.
I wrapped mine on the car seat and placed a pin where the top over lapped the other end.

Measured down 1/2 inch from the pin (that is how far in the velcro on the other end is sewn) and pin the velcro in place.
(Mine was placed 3/4 inch from the end of the strap.)

Now sew the buttons on top, to hide the stitching from the velcro.
Straps are done!

Main Body:
Place the 2 long strips on the top and bottom of the TOP fabric (right-sides together), pin and sew.
Iron seams open.
.jpg)
Cut 2 pieces of ribbon both measuring 35 inches. Place, pin, and sew on the top and bottom seams.
*Topstitch on both sides of the ribbon just as you did for the straps.*


I now place the TOP fabric and the BOTTOM fabric right-sides together.

Grab a big bowl and trace with marking pen a rounded corner on all 4 corners.
(You may notice I have an extra seam toward the end on the polka-dot fabric, that will mostly be cut off with the rounded corner. I cut my fabric incorrectly and had to piece this together. Yours should not have this.)

Now cut all the corners following your markings.

Fold the TOP fabric together to find center and iron a crease (crease should go from front to back).
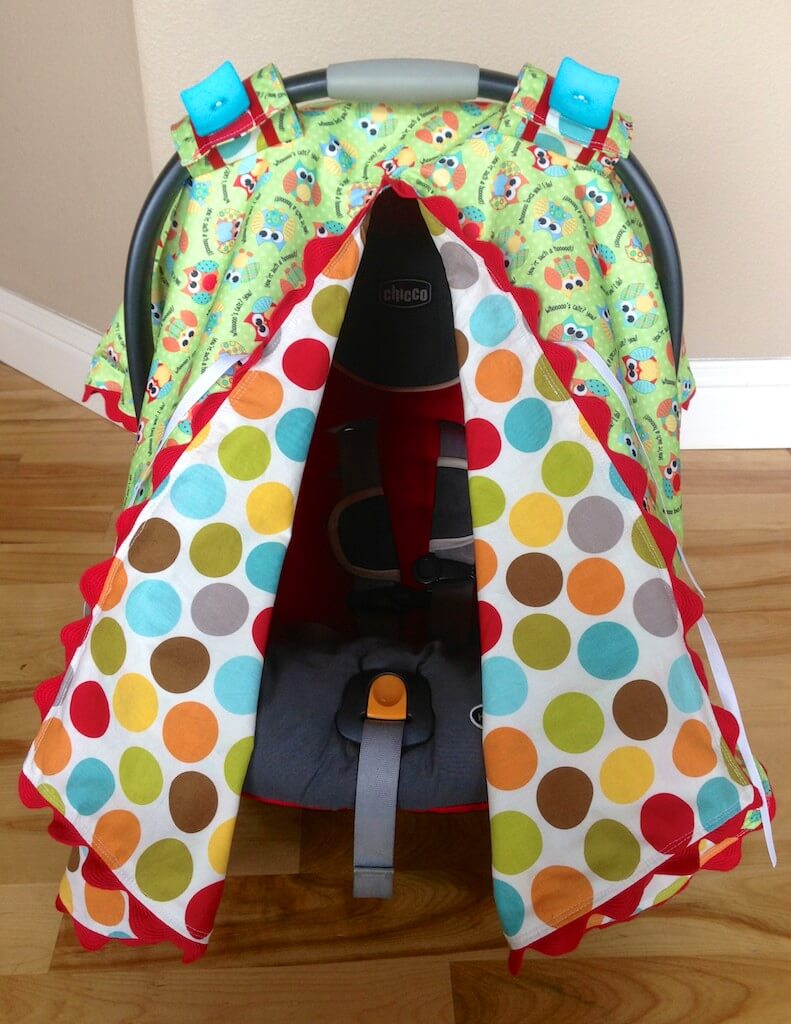
Then cut up the crease 19-1/2 inches to make front slit.
Front slit is optional. You can just skip this step if you don’t want a slit.

Place TOP and BACK fabrics right-sides together and cut the slit up the BACK fabric so that the top and back fabrics both have an identical slit.
Pin together.

Begin placing the rick-rack in the slit.
(I had my rick-rack poke 1/4 inch out of the seam, just like you see below.)

When you come to the corner on the bottom of the slit, turn rick-rack like so and pin in place.


Continue pinning all the way around until you reach where you began, the other side of the slit.
I measured as I went to make sure all my rick-rack was poking out 1/4 inch.

Cut 4 pieces of ribbon each measuring 10 inches long. Burn or seal the ends of all 4 ribbon pieces.
*This ribbon is for tying the slit closed.*
Now you need to pin the ribbon in place.
I measured up 6 inches from the bottom of the slit and fed the ribbon in between both fabrics, next to the rick-rack, until the ribbon was lined up exactly with the raw edges of the 2 fabrics.
I then repeated for the other side of the slit so that these 2 ribbon pieces would be at the exact same height to tie the slit closed.
Now measure down 6 inches from the top of the slit, on both sides, and do the same thing.
(I should have taken more pictures for this step … below is what the finished product will look like. Look at the white ribbon.)


Now sew a 1/2 inch seam around the whole thing.
(At the top of the slit, sew it rounded 1/2 inch. See pic below.)
Leave about 10 inches un-sewn so you can flip it right side out.

Before flipping inside out . . .
Cut corners off.
Clip little slits 1 inch apart into rounded corners.
Clip slits into the top of the slit (in picture above.)
This will help it lay better when you flip it right-side out.


Now flip right-side out.
Pin opening closed and topstitch just as you did for the straps.
(Topstitch 1/4 inch and then go back and do 1/8 inch topstitch.)
The main body is done!
.jpg)
Strap Placement:
The straps will be . . .
14-1/4 inches from the top,
10-1/2 inches from the side,
and 19 inches from the bottom.


.jpg)
The straps should be 5-3/4 inches apart.

Place pins 4 inches down from the top of the strap and 2-1/2 inches up from the bottom of the strap.
(This will cause the pins to be at the 4 inch and 5-1/2 inch lines of the 8 inch strap.)

Draw lines with your marking pen so you know where to sew.
I stitched it twice to reinforce the handles.

This is how my finished handles look.

Now you are all done!!! Place onto the carseat and tie the ribbons closed.
Note: Here is how to tie a bow perfectly.

Notice that the corners on the front are off the ground and don’t drag.
This is very important or they get very dirty!!!


Here is a carseat canopy I made for my sister, who had a little girl. This is an example of what a solid fabric looks like for the inside fabric.


I absolutely love this tutorial!!! Thank you very much. I am almost finished with one for a friend and I know she will love it also.
Thank you so much Tammy! I bet she will love it.
Thanks so much for your tutorial. Our daughter is expecting twin daughters in February (so exciting) so now she is finding all this neat stuff for “g’ma” to sew! So many new and neat ideas since I was a new mom years ago. But this canopy was something she wanted to see if I could make. I looked and looked online (not knowing what a “carseat canopy” even was!! lol) But your instructions and pictures were great! She also wants me to put the girl’s names on them to personalize them. So now off for a fabric shopping trip. Thanks again so very much.
Betty that is so exciting; Twins, how fun!!! I’m so glad that my tutorial helped. Carseat canopies are definitely a must with babies!
thanks for this awesome tutorial! I love my cover! I posted my finished product on my blog and linked back to you!
http://thethomasempire.blogspot.com/2014/06/projects.html
You did a fantastic job! I love the colors!!!
Do you have an Etsy shop? I love your style of canopy and would love to purchase one from you! 🙂
Thanks Sincerely,
Veronica
Veronica, thank you for the wonderful compliment! I actually don’t have an etsy shop. I like to use quality fabric and supplies, so my price for a canopy is higher than other canopies found on etsy. I’m afraid if I made you a canopy it would be more than you might want to pay. Are you still interested?
How much do these roughly cost to make . Don’t suppose anyone makes these to order
I’m sooooo sorry I have not responded Julie! I have not seen this until today, for some reason my filter put your comment into spam. I would say it costs about $35 to make. Maybe a little more maybe a little less, depending on what fabric you use.
Hi Genevieve! Thanks for the great tutorial. You are such a pro-seamstress – I’m so impressed by your work. I gave your tutorial a try and made a car seat canopy. Couldn’t have done it without your guidance, thanks for lesson!
Thanks Dave Jay!
Thank you for taking the time to put a tutorial up. I’ve made 3 car seat covers :(one with a window) but I wanted to see how much fabric I needed to do a slit. I actually still would rather do snaps than ribbons (thought snaps make noise when they open). I bet you could follow this tutorial and use elastic loops around buttons instead of ribbons. 🙂
Your welcome Jessica! It makes my day when I get a comment like this. 😀 Yes, you could easily convert this tutorial to do elastic loops and buttons, instead of the ribbon. It’s a wonderful idea!
I used your instructions over a few I looked at. I used print and solids. I had to hand sew mine! I don’t have a sewing machine. But I am home bound so it helped me pass the time. My son fell in love with all I made. I made a canopy, head rest, 2 blankets and 6 burp cloths! (Maybe Santa will bring me a sewing machine!)
Hi Genevieve
Thank you so much for an awesome tutorial. I have one question. My front is a tad to long and now hangs on the ground, how can I fix this?
Lizel,
The only way I can think of how to fix that is to unpick the straps and move them forward slightly. This will re-align where the canopy sits on the carseat. After unpicking I would pin the straps slightly forward, on to the canopy, and try it on the carseat BEFORE SEWING to see if you moved them far enough forward. If it still touches the ground I would move them a little more and try it on again BEFORE SEWING. If it sits where you want it I would then sew the straps onto the canopy. Make sense? Thank you for the question!
A great tutorial and a wonderful car seat cover. Thanks so much for sharing it. You did a great job of explaining each step.
Hi Genevieve,
I’ve just finished doing a nice car seat canopy by following your tutorial. The explanations are very clear, everything went smoothly! I’ve changed the velcro by some snaps as I wanted it more sturdy. Thank you so much! I’ve uploded some pictures on my website to share the result (and I wrote the link to your site too!) : https://premieregrossesseblog.wordpress.com/2016/02/29/auvent-pour-siege-dauto/ ( sorry it is in french). Once again, thank you, it is a very fun project to do!
Amazing tutorial. So easy to follow all the steps. Thanks so much. Definitely think I can make his for my soon to be new baby girl granddaughter Morgan! Beautiful selection of fabric. Hope mine turns out so nice.
Thank you so much for the kind words Kim! I bet yours will turn out adorable. Congratulations on your soon-to-be new granddaughter!!!
What is the name of the polka dot material? Is the green owls a PUL product?
Carol – I’m actually not sure what the polka-dot fabric is called. It has been almost 4 years since I made this owl cover and I can’t remember what it was. I’m very sorry. The owl fabric is a PUL. I’m obsessed with all things owl and just couldn’t not buy this when I found it. I made this cover and several bibs with it. I wasn’t sure if I would like it on the carseat cover, but have ended up loving it when it rains. The water just runs off instead of soaking into the fabric. I hope this was at least a little helpful.
Thank you Genevieve for your great tutorial! I Hand so much fun sewing it and in a few month your canopy will be used by a friend of mine here in Germany. If I had seen this only four years earlier ?
Pearl,
Thank you so much! I’m so glad that you used it!!!
Thank you for the pattern and the tutorial! I made one for my son and one for my niece and love them! I am starting a home business and was wondering if you are okay with people selling things made from your patterns if a link to your website is provided. Thanks so much!
Of course! I’m just happy that you enjoy the pattern and tutorial!!!
Well I FINALLY figured out and it turned out BEAUTIFUL. I took a break and that’s all I needed to think clearly. THANK YOU for the wonderful pattern.
I just finished my first. It turned out cute. Made for it my daughter, who is due shortly. Wish I could leave a picture .
Patricia,
I’m so glad it turned out! I wish you could leave a picture as well.
Thank you for the tutorial. I just completed one for my new grandson. I used snap tape instead of ribbon for closure of the flap.
Sandy,
Your welcome! Snap tape is a fantastic idea!
Thank you for this awesome tutorial! I made one for my baby girl (expected June 28) and I love it so much. I made a couple of modifications, hopefully I can share pics soon.
You’re welcome! I would love to see pictures!